Understanding WordPress Posts
WordPress powers millions of websites worldwide, and for good reason: it’s powerful, flexible, and relatively user-friendly once you understand the basics. This guide will walk you through everything you need to know about creating and updating blog posts in WordPress.
In WordPress, posts are typically time-sensitive content entries displayed in reverse chronological order on your blog section. They’re categorized, tagged, and included in your site’s RSS feed. Posts are perfect for regular content updates like blog articles, news items, or announcements.
Creating a New Post in WordPress
Step 1: Access the WordPress Dashboard
- Log in to your WordPress admin area (usually at yourdomain.com/wp-admin)
- Once logged in, you’ll see the WordPress Dashboard, your control center for website management
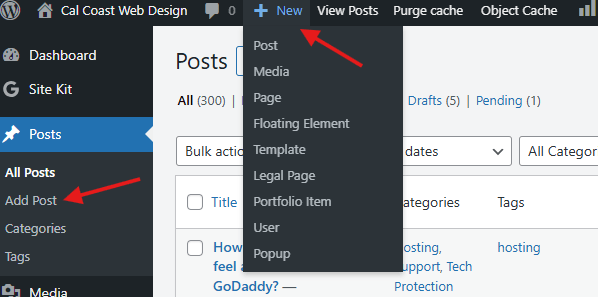
Step 2: Initiate a New Post
- From the Dashboard sidebar, hover over “Posts” and click “Add New”
- Alternatively, you can click on the “+ New” button in the top admin bar and select “Post”
Step 3: Add a Compelling Title

- Click on “Add title” at the top of the editor
- Enter a clear, engaging title that accurately reflects your content
- Remember that your title is crucial for both SEO and catching readers’ attention
Step 4: Using the Block Editor (Gutenberg)
WordPress uses a block-based editor called Gutenberg, which makes content creation more visual and flexible. Here’s how to use some common blocks:
Paragraph Block
- Simply start typing in the editor to create a paragraph block. This is the default block type.
- To create a new paragraph, press Enter
- Format text using the toolbar that appears above the block (bold, italic, links, etc.)
Heading Block
- Click the “+” icon to add a new block
- Search for “Heading” or find it in the common blocks section
- Select the appropriate heading level (H2-H6) from the block toolbar
- Enter your heading text
- Pro tip: Use headings hierarchically (H2 for main sections, H3 for subsections, etc.) for proper post structure and SEO
Image Block
- Click the “+” icon and select “Image”
- Choose to upload an image, select from your Media Library, or insert from URL
- Once inserted, you can:
- Add alt text (important for accessibility and SEO)
- Adjust alignment (left, center, right)
- Resize the image
- Add a caption if needed
List Block
- Click the “+” icon and select “List”
- Choose between bulleted or numbered lists
- Type your list items, pressing Enter after each
- Tab to indent and create nested lists
Quote Block
- Click the “+” icon and select “Quote”
- Enter the quote text
- Optionally add a citation
Other Useful Blocks
- Table: For presenting data in rows and columns
- Button: For clear calls-to-action
- Columns: To create multi-column layouts
- Embed: For adding content from YouTube, Twitter, and other platforms
- Shortcode: For using plugins that utilize shortcodes
Visit the WordPress.org documentation more detail on using the block editor.
This short video will cover the basics of using the WordPress block editor.
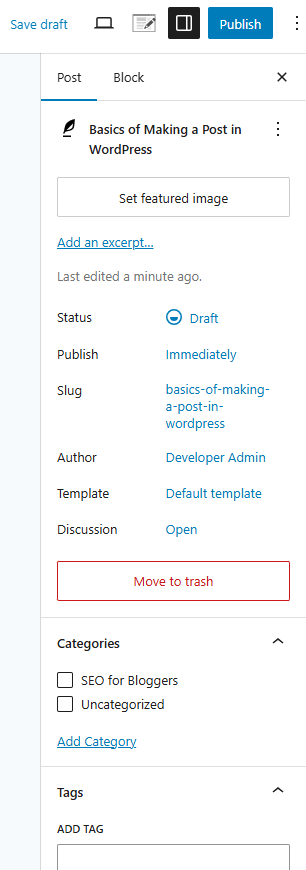
Step 5: Adding Categories and Tags
Categories and tags help organize your content and make it easier for visitors to find related information.
Adding Categories:
- Look for the “Categories” panel in the right sidebar
- Select existing categories that apply to your post
- To create a new category, click “Add New Category”
- Enter the category name and optionally select a parent category
- Click “Add New Category”
Pro tip: While you can assign multiple categories to a post, it’s best practice to assign one primary category and use tags for additional organization.
Adding Tags:
- Find the “Tags” panel in the right sidebar
- Type your tags separated by commas
- Press Enter or click “Add”
- Tags should be specific keywords relevant to your post
Pro tip: Use 5-10 relevant tags per post for optimal organization without overwhelming your taxonomy.
Step 6: Setting a Featured Image
The featured image appears as a thumbnail for your post on your blog page, archives, and sometimes social media when shared.
- Look for the “Featured Image” panel in the right sidebar
- Click “Set featured image”
- Upload a new image or select one from your Media Library
- Click “Set featured image” to confirm
Best practices for featured images:
- Use high-quality, relevant images
- Maintain consistent dimensions across your blog
- Optimize image size for web (typically under 200KB)
- Include alt text that describes the image
Step 7: Previewing Your Post
Before publishing, it’s wise to preview how your post will look:
- Click the “Preview” button in the top-right corner
- This opens a preview in a new tab
- Check the layout, formatting, images, and overall appearance
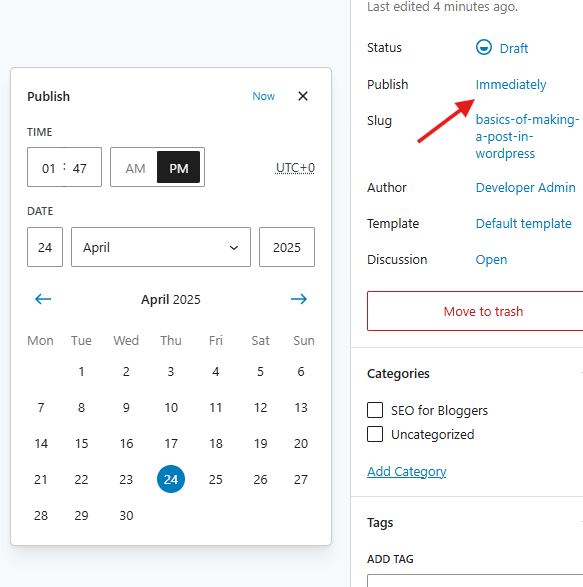
Step 8: Publishing Options
WordPress offers several publishing options:
- Publish immediately: Click the “Publish” button
- Schedule for later:
- Click “Publish” dropdown
- Toggle “Publish immediately”
- Set your desired date and time
- Click “Schedule”
- Save as draft: Click “Save draft” to continue working later
- Set visibility:
- Click “Public” dropdown
- Choose between Public, Private, or Password protected
Step 9: Publish!
Once you’re satisfied with your post:
- Click the “Publish” button
- After publishing, you’ll see a confirmation message with a link to view your post
The WordPress documentation is the best resource for mastering the block editor. Click Here to learn more about using the block editor for creating posts.
Advanced Post Options
Excerpt
The excerpt is a summary of your post that appears on blog archives and search results:
- Look for the “Excerpt” panel in the sidebar
- Write a compelling 1-2 sentence summary of your post
- If you don’t provide an excerpt, WordPress will use the first 55 words of your post
Discussion Settings
Control comments and pingbacks:
- Find the “Discussion” panel
- Check or uncheck “Allow comments” as desired
- Check or uncheck “Allow pingbacks & trackbacks” as needed
Author
In multi-author blogs, you can assign different authors:
- Look for the “Author” panel
- Select the appropriate author from the dropdown
Updating Existing Posts
Keeping your content fresh and accurate is just as important as creating new content. Here’s how to update existing posts:
Finding Posts to Edit
- Go to Posts > All Posts in the Dashboard
- Use the search box or filters to find specific content
- Hover over the title and click “Edit”
Making Updates
- Edit text, images, or any other elements using the block editor
- Add new blocks or remove existing ones as needed
- Update categories, tags, or featured images if necessary
- Consider adding an “Updated on [date]” note for significant changes
Saving Changes
- Click “Update” to save and publish your changes
- WordPress will maintain a revision history of your changes
Additional Tips for WordPress Post Creation
This video goes into more detail on how to use the block editor to help you craft the prefect post.
Understanding the Block Library
Click the “+” icon or use the “/” command while typing to explore all available blocks. WordPress has dozens of built-in blocks for various content types.
Using Block Patterns
Block patterns are pre-designed layouts that combine multiple blocks:
- Click the “+” icon
- Go to the “Patterns” tab
- Browse available patterns and insert the one you like
Reusable Blocks
For content you use frequently:
- Select a block or multiple blocks
- Click the three dots in the block toolbar
- Select “Add to Reusable blocks”
- Name your reusable block
- Access it anytime from the “Reusable” tab in the block inserter
Keyboard Shortcuts
Speed up your workflow with these helpful shortcuts:
- Ctrl+S (Windows) or Cmd+S (Mac): Save draft
- Ctrl+Z (Windows) or Cmd+Z (Mac): Undo
- “/” followed by block name: Quickly insert a block
- Alt+Shift+H: View all keyboard shortcuts
Optimize for SEO
Consider these SEO best practices for your posts:
- Install an SEO plugin like Yoast SEO or Rank Math
- Fill in meta descriptions and focus keywords
- Use headers logically (H2, H3, etc.)
- Include internal and external links
- Optimize images with alt text
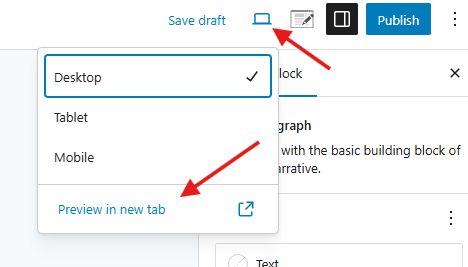
Mobile Preview
Check how your post will look on mobile devices:
- Click the Preview button
- In the preview window, look for the device icons at the bottom
- Switch between desktop, tablet, and mobile views
Content Planning
For a consistent blog:
- Create an editorial calendar
- Plan categories in advance
- Maintain a consistent posting schedule
- Prepare a template for similar post types
Troubleshooting Common Issues
Block Editor Not Loading
- Try using a different browser
- Disable conflicting plugins
- Increase PHP memory limit
Images Not Displaying
- Check if the image was properly uploaded
- Verify the image path
- Ensure the image format is supported
Formatting Problems
- Use the “Convert to blocks” option for legacy content
- Try selecting and re-inserting problematic blocks
- Check for HTML issues in the code editor view
Categories or Tags Not Saving
- Clear browser cache
- Check for plugin conflicts
- Verify user permissions
Create Appealing Post Layouts without Code
Mastering WordPress posts is fundamental to running a successful blog or content-driven website. With this guide, you now have the knowledge to create engaging, well-structured posts that will captivate your audience. Remember, practice makes perfect – the more you use WordPress, the more comfortable you’ll become with its features and capabilities.
As you grow more comfortable with the basics, explore additional features like custom fields, post formats, and advanced formatting options to take your WordPress posts to the next level. Happy blogging!