If you’ve ever felt overwhelmed trying to edit a WordPress website, you’re not alone. Traditional WordPress editing can feel clunky and disconnected from the actual visual result. That’s where Breakdance comes in… a powerful visual page builder that lets you design and edit web pages directly on the canvas, seeing your changes in real time.
Whether you’re a business owner making updates to your own site or someone just getting started with WordPress, this guide walks you through the essential steps for editing pages with Breakdance.
What Is Breakdance?
Breakdance is a WordPress page builder plugin that replaces the default WordPress editor with a full visual design environment. Instead of guessing what your content will look like on the front end, you design and edit everything visually… text, images, layouts, buttons, and more… all within a clean, intuitive interface.
Step 1: Open a Page in Breakdance
To start editing a page, log into your WordPress dashboard and navigate to Pages. Find the page you want to edit and hover over it. You’ll see an “Edit with Breakdance” link appear — click that to launch the Breakdance editor.
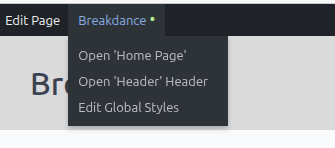
Alternatively, if you’re already viewing the page on the front end while logged in, you may see an Breakdance button in the admin bar at the top of the screen. Hover over it, and you will see Open ‘Name of Your Page’
Step 2: Get Familiar with the Breakdance Interface
When the editor loads, take a moment to orient yourself. The Breakdance interface consists of a few key areas:
The Canvas — the center area where your page is displayed and edited visually.
The Left Panel — where you’ll find the element library, structure panel, and settings for selected elements.
The Top Bar — contains controls for device preview, undo/redo, saving, and publishing.
Clicking on any element on the canvas will select it and open its settings in the left panel. This is where you’ll make most of your edits.
New to Breakdance? Check out the Breakdance Newbie Guide: Building a Page From Scratch: a detailed video tutorial that walks through the entire interface and covers everything from navigating the editor to building your first page from the ground up. It’s an excellent starting point for anyone just getting started.
Step 3: Edit Text Content
One of the most common editing tasks is updating text including headlines, paragraphs, button labels, and so on.
To edit text in Breakdance, simply double-click on the text element you want to change. This activates the inline text editor, where you can type, select, and format text just like a word processor. From the settings panel on the left, you also have access to font family, font size, font weight, line height, color, and alignment controls.
For more advanced formatting, like changing a heading style globally or adjusting typography across the whole site, Breakdance’s Global Styles system lets you define fonts and text settings once and apply them everywhere.
Step 4: Work with Images
To update or add an image, click on an existing image element to select it. In the left panel, you’ll see an option to change the image source. Click it to open the WordPress media library, where you can:
Select an existing uploaded image
Upload a new image from your computer
Provide an external image URL
Breakdance also gives you control over image sizing, alt text (important for accessibility and SEO), object fit, and how the image behaves at different screen sizes.
Step 5: Adjust Layouts and Spacing
Beyond text and images, Breakdance gives you control over the structure and spacing of your page. Each element has settings for:
Padding and Margin — control the space inside and around elements
Width and Height — set fixed or flexible dimensions
Display and Flexbox settings — control how child elements are arranged within a container
These settings are found in the Layout and Spacing sections of the left panel when an element is selected. Take care not to over-edit layout settings unless you understand the structure. A small change to a parent container can affect all the elements inside it.
Step 6: Use Breakdance Elements
Breakdance includes a large library of built-in elements you can add to any page. To browse them, click the + (Add Element) button, typically found at the top of the left panel or within a section on the canvas.
Some commonly used elements include:
Text and Heading — for body copy and titles
Image — for photos and graphics
Button — for calls to action
Div / Section / Column — for creating layout structure
Icon, Spacer, Divider — for visual detail and spacing
Video, Map, Form — for interactive content
Each element is customizable through its settings panel, giving you control over appearance, content, and behavior.
One of Breakdance’s most important features is its built-in responsive design tools. Your edits can look different on desktop, tablet, and mobile screens, so it’s important to preview and adjust each breakpoint.
At the top of the editor, you’ll find device icons to switch between Desktop, Tablet, and Mobile views. When you switch to a smaller breakpoint, any changes you make to layout, spacing, or font sizes will apply only to that device size, leaving your desktop layout intact.
Always check your page on all three breakpoints before publishing, especially after making significant layout changes.
Step 8: Save and Publish Your Changes
Once you’re happy with your edits, click the Save button in the top bar. Breakdance gives you the option to save as a draft (so changes aren’t yet visible to visitors) or publish immediately.
It’s a good habit to preview the page on the front end after saving to confirm everything looks correct before directing visitors to it.
Quick Tips for Editing in Breakdance
Undo freely — Breakdance supports multi-step undo (Ctrl+Z / Cmd+Z), so don’t be afraid to experiment.
Use the Structure Panel — if you’re having trouble clicking the right element, the structure panel (a tree view of all elements on the page) makes it easy to select exactly what you need.
Don’t edit Global Styles by accident — changes to Global Styles affect the entire site, not just the current page. Be intentional when modifying them.
Save often — especially before making major structural changes.
Learn More
Getting comfortable with Breakdance takes a little practice, but the payoff is a much more enjoyable editing experience and a lot more creative control over your website. These resources are great places to continue learning: